Back to the homepage

Manuals · AstroStation & XL

From power-on to your first observing advice.

Download the manual for the compact AstroStation or Polaris XL below. The quick start on this page follows the compact 2.8-inch model.

Have these readyAstroStation, your Wi-Fi details and a USB power supply.

AstroStation 2.8 inch · Updated Dutch manualDownload version 1.3PDF · 18 pages · 1.7 MB · firmware 3.0 alpha 9.4.40

Polaris XL · Updated Dutch manualDownload XL version 1.4PDF · 21 pages · 1.4 MB · firmware v0.15.0.66

Updated on 7 October 2026. Both PDFs are in Dutch and describe the current firmware, including setup, support and OTA updates.

Startup & setup

What you see during the first startup.

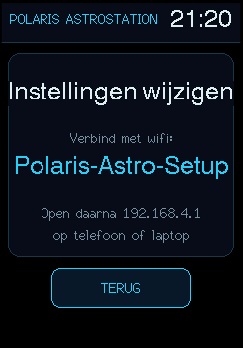
The Wi-Fi instructions appear after the start screen. Connect to Polaris-Astro-Setup, then open 192.168.4.1 on your phone or laptop.

The Polaris AstroStation start screen
01 Start screen
The Wi-Fi instructions for Polaris-Astro-Setup
02 Wi-Fi setup
The same order as the device

Each chapter follows one tab along the bottom of the touchscreen, making it easy to find the screen in front of you.

The complete manual

Choose the screen in front of you.

From current weather to network management, the guide follows AstroStation’s five permanent tabs in order.

Screenshots with callouts

Understand each screen at a glance.

These screen examples show the layout of the compact AstroStation. Some details may differ from the current firmware; use the updated PDF above for the latest instructions.

01
WEATHER

Current conditions

This is the first screen after startup. It shows the current weather before you move on to the astronomical advice.
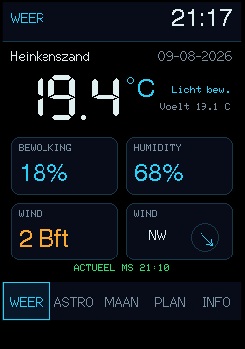
The WEATHER screen of Polaris AstroStation showing temperature, cloud cover, humidity and wind
Current weather
  1. 01
    Current overview

    Your location, date, temperature and a short description of the current weather appear at the top.

  2. 02
    Four key values

    Cloud cover, humidity, wind force and wind direction summarise the conditions right now.

  3. 03
    Freshness and navigation

    The green line shows when the data was updated; use the bottom bar to open another screen.
02
ASTRO

Hourly score and advice

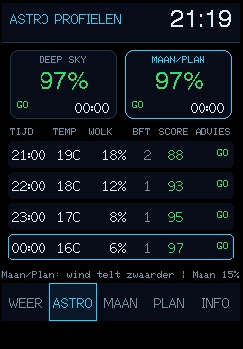
See how favourable the conditions are each hour and when the best observing window begins.

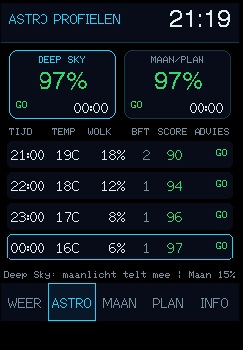
The ASTRO screen with the Deep Sky profile selected
Deep Sky profile
The ASTRO screen with the Moon and Planets profile selected
Moon/Plan profile
  1. 01
    Two observing profiles

    Choose Deep Sky or Moon/Plan. The coloured outline marks the active profile; its score and start time appear in the same tile.

  2. 02
    Hourly advice

    Each row combines time, temperature, cloud cover, wind force, score and the corresponding advice.

  3. 03
    Profile weighting

    The line beneath the table explains which factor receives extra weight in the selected profile and shows the current lunar illumination.

03
MOON

Sun, phase and moon window

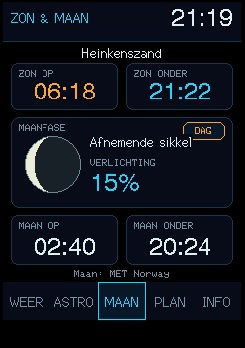
Read the solar data, current lunar phase and the available window with little or no moonlight.

The SUN AND MOON screen showing rise and set times, lunar phase and illumination
Sun and Moon data
  1. 01
    Sunrise and sunset

    The times at the top show immediately when daylight begins and ends.

  2. 02
    Lunar phase and illumination

    The phase is shown visually, with its name and the illuminated percentage alongside it.

  3. 03
    Moon window

    Moonrise and moonset help determine which part of the night will be darkest for your session.

04
PLAN

Planet visibility

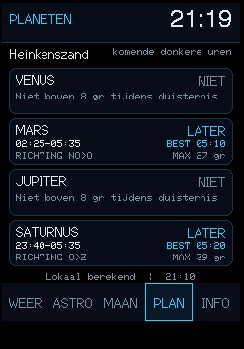
Check which planets are visible and use that information when planning your observing session.

The PLANETS screen showing visibility and best times for each planet
Planet windows
  1. 01
    Location and period

    The calculation uses your location and looks at the coming dark hours.

  2. 02
    Window for each planet

    For each planet, you can see whether it is visible now, rises later or is poorly placed during this period.

  3. 03
    Calculated locally

    The time at the bottom confirms when the planetary data was calculated locally.

05
INFO

Network, updates and management

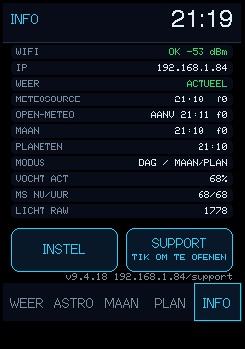
Find connection details, updates and management functions. The IP address in INFO also provides access to the local support page.

The INFO screen showing network status, data sources, controls and firmware version
Status and management
  1. 01
    Connection and sources

    Check Wi-Fi, signal strength, the IP address and the times when weather, Moon and planet data were updated.

  2. 02
    System status

    Mode, current humidity, Moon hour and display brightness provide extra diagnostic information.

  3. 03
    Settings and support

    Open the settings or support page with the two buttons. The active firmware version is shown directly above them.